In this post, I am going to create a simple library management client using hibernate and java swing.
I will show you how to use JBoss Tools to generate PoJo classes and hibernate configuration files and hibernate schema files from database tables.
Step 1. Create 5 mysql db tables in SQLyog,

To define foreign keys for at table, use mouse to select the table and press F10, Management Relationships window will show up. You can configure foreign key relationships there. Remember source column and target column both need to be indexed and both have the same datatype.

Step 2. I manually added a few data into the tables through phpmyadmin GUI.
Step3. I created a new java project in eclipse called LibrarySwingHibernateDemo.
Step4. Open eclipse marketplace and enter jbosstools in the search box, install the right version for your eclipse.

Step 5. install jboss tools and restart eclipse. Jboss tools contains Hibernate tools which is the real interest.
Step 6. Switch to Hibernate Perspective. Right click project’s source folder and choose to Create hibernate config file.
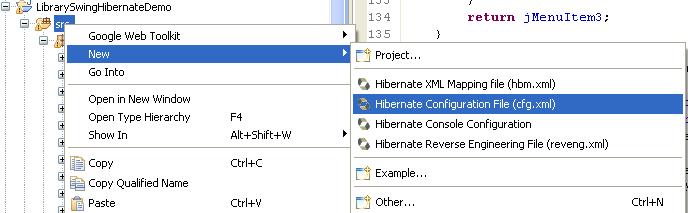
Make sure session –factory element’s name attribute is removed.
<?xml version="1.0" encoding="UTF-8"?>
<!DOCTYPE hibernate-configuration PUBLIC "-//Hibernate/Hibernate Configuration DTD 3.0//EN"
"http://hibernate.sourceforge.net/hibernate-configuration-3.0.dtd">
<hibernate-configuration>
<session-factory>
<property name="hibernate.connection.driver_class">com.mysql.jdbc.Driver</property>
<property name="hibernate.connection.password">xxxxxx</property>
<property name="hibernate.connection.url">jdbc:mysql://localhost:3306/library</property>
<property name="hibernate.connection.username">root</property>
<property name="hibernate.dialect">org.hibernate.dialect.MySQLDialect</property>
<property name="hibernate.current_session_context_class">org.hibernate.context.ThreadLocalSessionContext</property>
<property name="show_sql">true</property>
</hibernate-configuration>
Step 7. Download Hibernate binary from http://sourceforge.net/projects/hibernate/files/hibernate3/3.6.5.Final/
Download apache common logging(it is optional) binary from
Download mysql jdbc driver from
find the right version for your mysql server.
In the end add jar files to project build path.

Step 8. We will create a new Hibernte Console Configuration. Add project and configuration file by following the screenshot below keep the rest untouched. Maybe classpath also need to be updated.

Now you should be able to open the database section of the console configuration we just created. (Remember, session –factory element’s name attribute should be removed, otherwise you will get some session factory jndi error)
Step 9. We need to create a reverse engineering configuration file before we can generate schema and pojo class files. Right click src folder and choose Hibernate Reverse Engineering File. A reverse engineering file is used to define how reverse engineering is going to proceed.

Include the tables need to be reverse engineered.

Select finish and we will get a reverse engineering file. There are other options waiting for you to explore.
<?xml version="1.0" encoding="UTF-8"?>
<!DOCTYPE hibernate-reverse-engineering PUBLIC "-//Hibernate/Hibernate Reverse Engineering DTD 3.0//EN" "http://hibernate.sourceforge.net/hibernate-reverse-engineering-3.0.dtd" >
<hibernate-reverse-engineering>
<table-filter match-name="author" match-catalog="library"></table-filter>
<table-filter match-name="book" match-catalog="library"></table-filter>
<table-filter match-name="booksofauthor" match-catalog="library"></table-filter>
<table-filter match-name="borrowhistory" match-catalog="library"></table-filter>
<table-filter match-name="person" match-catalog="library"></table-filter>
</hibernate-reverse-engineering>
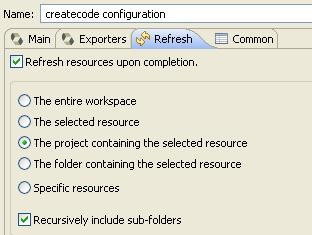
Step 9. We are here, ready to generate schema files and pojo classes. Select Hibernate Code Generation Configurations…
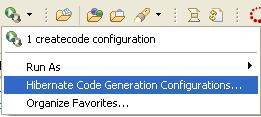
Following sceenshots show how it should be configured. After the configuration is finished, press the run button at the right bottom corner, you will see magic happen.


Step 11. The schema files and pojo classes are generated as shown below. Now we go back to hibernate configuration file. Double click config file and select session factory tab. Add auto generated hibernate schema files to the mappings section.

We turn back to console configuration, we will see the Configuration section is now able to be opened. Right click configuration item and select Mapping Diagram, you will get nice database relation diagrams.


Step 12. I made a simple swing client which do some queries based on hibernate API. Here is how it a book searching window looks.

I made a search function based on book’s ISBN number, book’s author name and book title.

It involves 3 tables, book, bookofauthor and author. And the result is the book info including the authors. I haven’t found a way to do the query using criteria.
Instead, I used HQL to do the work. To get a picture of the database table structure please refer to the database mapping diagram generated in step 11.
HQL is not direct mysql query language. The table and table field names used in HQL is following the definition of the pojo class files. Hibernate engine will convert the HQL query to mysql query at the background. And mysql functions are not supported in HQL, at least not for the version of jdbc connector I am using.
Mysql query,
select distinct b.bookId, b.bookName, b.isbn13, b.bookDescription, b.storage, group_concat(a.name) as authors from book b left join booksofauthor boa on b.bookId = boa.bookId left join author a on boa.authorId = a.authorId where b.bookId in
(select distinct b.bookId from book b left join booksofauthor boa on b.bookId = boa.bookId left join author a on boa.authorId = a.authorId where a.name like '%za%' group by b.bookId)
group by b.bookId
HQL query,
select distinct b.bookId, b.bookName, b.isbn13, b.bookDescription, b.storage, a.name from Book as b left join b.booksofauthors as boa left join boa.author as a where a.name like ‘%za%’ group by b.bookId
for each bookId {
select distinct b.bookId, a.name from Book as b left join b.booksofauthors as boa left join boa.author as a where b.bookId = " + book.getBookId().toString()
}
Notice the main difference is the use of table and field names, in mysql query, you can use the table name defined in database. In HQL query, you need to use the main table name plus the member name defined in pojo classes, such as b.booksofauthors, boa.author.
No comments:
Post a Comment