Question, given 12 balls, one of them is heavier or lighter than the other balls. You can use a balance to weigh these balls, how do you get the special ball out of the 12 balls by only weighing them 3 times?
I have seen similar question before, and believe you can get the answer elsewhere. But anyway, I solved it by my own. You are welcome to try it without seeing the answer.
As usual, I didn't get the answer right away. I managed to find a solution after 2 hours in the end. Here is my solution,
I take examples of 12 balls in following number,
1 2 3 4 5 6 7 8 9 10 11 12
First situation
step 1. compare 1234 against 5678
if they are equal
then
step 2. we compare 123 against 9 10 11
if they are equal then 12 is the special ball
step 3. compare 12 against any other balls to get its weight
step 2 again
if they are not equal, the special ball is among 9 10 11, and we know weather it is heavier or Lighter from step 2
step 3. compare 2 balls within 9 10 11, if they are equal, the rest one is special ball, otherwise we can judge the
special ball by its weight
Second situation
step 1. compare 1234 against 5678
suppose 1234 is heavier than 5678
then we know the special ball is among the 8 balls, and ball 9 10 11 12 are normal balls
step 2. we then compare 1567 against 9 10 11 8
if they are equal, then the special ball is among 234
step 3. compare 2 balls within 234, if they are equal, the rest one is special ball, otherwise we can judge the
special ball by its heavier weight
step 2. again if 1567 is still heavier than 9 10 11 8,
we conclude that it is impossible that the special lighter ball is among 567, otherwise 1567 will be lighter than 9 10 11 8
therefore special ball is among 1 and 8
then by comparing 1 or 8 to any common ball, if 1 is equal to common ball weight, the 8 is a special lighter ball, otherwise, 1 is a special heavier ball
step 2. again if 1567 is lighter than 9 10 11 8,
we conclude that the special ball is among 567, because if 567 are all common balls, by switching side, it won't cause the balance to switch side
and we know, there is a lighter ball among 567
step 3. compare 2 balls within 5 6 7, if they are equal, the rest one is special ball, otherwise we can judge the
special ball by its lighter weight
Monday, August 15, 2011
Tuesday, July 12, 2011
A Hibernate demo with Eclipse JBoss Tools
In this post, I am going to create a simple library management client using hibernate and java swing.
I will show you how to use JBoss Tools to generate PoJo classes and hibernate configuration files and hibernate schema files from database tables.
Step 1. Create 5 mysql db tables in SQLyog,

To define foreign keys for at table, use mouse to select the table and press F10, Management Relationships window will show up. You can configure foreign key relationships there. Remember source column and target column both need to be indexed and both have the same datatype.

Step 2. I manually added a few data into the tables through phpmyadmin GUI.
Step3. I created a new java project in eclipse called LibrarySwingHibernateDemo.
Step4. Open eclipse marketplace and enter jbosstools in the search box, install the right version for your eclipse.

Step 5. install jboss tools and restart eclipse. Jboss tools contains Hibernate tools which is the real interest.
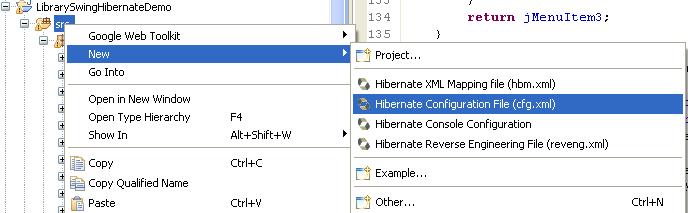
Step 6. Switch to Hibernate Perspective. Right click project’s source folder and choose to Create hibernate config file.
Make sure session –factory element’s name attribute is removed.
<?xml version="1.0" encoding="UTF-8"?>
<!DOCTYPE hibernate-configuration PUBLIC "-//Hibernate/Hibernate Configuration DTD 3.0//EN"
"http://hibernate.sourceforge.net/hibernate-configuration-3.0.dtd">
<hibernate-configuration>
<session-factory>
<property name="hibernate.connection.driver_class">com.mysql.jdbc.Driver</property>
<property name="hibernate.connection.password">xxxxxx</property>
<property name="hibernate.connection.url">jdbc:mysql://localhost:3306/library</property>
<property name="hibernate.connection.username">root</property>
<property name="hibernate.dialect">org.hibernate.dialect.MySQLDialect</property>
<property name="hibernate.current_session_context_class">org.hibernate.context.ThreadLocalSessionContext</property>
<property name="show_sql">true</property>
</hibernate-configuration>
Step 7. Download Hibernate binary from http://sourceforge.net/projects/hibernate/files/hibernate3/3.6.5.Final/
Download apache common logging(it is optional) binary from
Download mysql jdbc driver from
find the right version for your mysql server.
In the end add jar files to project build path.

Step 8. We will create a new Hibernte Console Configuration. Add project and configuration file by following the screenshot below keep the rest untouched. Maybe classpath also need to be updated.

Now you should be able to open the database section of the console configuration we just created. (Remember, session –factory element’s name attribute should be removed, otherwise you will get some session factory jndi error)
Step 9. We need to create a reverse engineering configuration file before we can generate schema and pojo class files. Right click src folder and choose Hibernate Reverse Engineering File. A reverse engineering file is used to define how reverse engineering is going to proceed.

Include the tables need to be reverse engineered.

Select finish and we will get a reverse engineering file. There are other options waiting for you to explore.
<?xml version="1.0" encoding="UTF-8"?>
<!DOCTYPE hibernate-reverse-engineering PUBLIC "-//Hibernate/Hibernate Reverse Engineering DTD 3.0//EN" "http://hibernate.sourceforge.net/hibernate-reverse-engineering-3.0.dtd" >
<hibernate-reverse-engineering>
<table-filter match-name="author" match-catalog="library"></table-filter>
<table-filter match-name="book" match-catalog="library"></table-filter>
<table-filter match-name="booksofauthor" match-catalog="library"></table-filter>
<table-filter match-name="borrowhistory" match-catalog="library"></table-filter>
<table-filter match-name="person" match-catalog="library"></table-filter>
</hibernate-reverse-engineering>
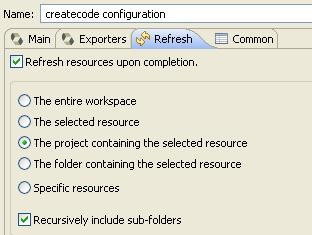
Step 9. We are here, ready to generate schema files and pojo classes. Select Hibernate Code Generation Configurations…
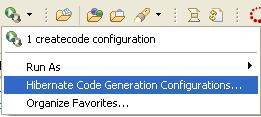
Following sceenshots show how it should be configured. After the configuration is finished, press the run button at the right bottom corner, you will see magic happen.


Step 11. The schema files and pojo classes are generated as shown below. Now we go back to hibernate configuration file. Double click config file and select session factory tab. Add auto generated hibernate schema files to the mappings section.

We turn back to console configuration, we will see the Configuration section is now able to be opened. Right click configuration item and select Mapping Diagram, you will get nice database relation diagrams.


Step 12. I made a simple swing client which do some queries based on hibernate API. Here is how it a book searching window looks.

I made a search function based on book’s ISBN number, book’s author name and book title.

It involves 3 tables, book, bookofauthor and author. And the result is the book info including the authors. I haven’t found a way to do the query using criteria.
Instead, I used HQL to do the work. To get a picture of the database table structure please refer to the database mapping diagram generated in step 11.
HQL is not direct mysql query language. The table and table field names used in HQL is following the definition of the pojo class files. Hibernate engine will convert the HQL query to mysql query at the background. And mysql functions are not supported in HQL, at least not for the version of jdbc connector I am using.
Mysql query,
select distinct b.bookId, b.bookName, b.isbn13, b.bookDescription, b.storage, group_concat(a.name) as authors from book b left join booksofauthor boa on b.bookId = boa.bookId left join author a on boa.authorId = a.authorId where b.bookId in
(select distinct b.bookId from book b left join booksofauthor boa on b.bookId = boa.bookId left join author a on boa.authorId = a.authorId where a.name like '%za%' group by b.bookId)
group by b.bookId
HQL query,
select distinct b.bookId, b.bookName, b.isbn13, b.bookDescription, b.storage, a.name from Book as b left join b.booksofauthors as boa left join boa.author as a where a.name like ‘%za%’ group by b.bookId
for each bookId {
select distinct b.bookId, a.name from Book as b left join b.booksofauthors as boa left join boa.author as a where b.bookId = " + book.getBookId().toString()
}
Notice the main difference is the use of table and field names, in mysql query, you can use the table name defined in database. In HQL query, you need to use the main table name plus the member name defined in pojo classes, such as b.booksofauthors, boa.author.
Wednesday, July 6, 2011
Examples of Velocity, xslt and StringTemplate
These template engines provide similar functionalities - transforming data into new contents based on a set of templates, and they are all compatible to java. You can pick any one of them as long as it can solve your problem. To process xml/html documents I would recommend xslt. Other text processing, I would recommend velocity. StringTemplate is powerful, but it is not well documented. If the task requires fast transformation and small memory use, dom parser based xslt transformation is not recommended. I will make a few simple examples in the article to bring you an idea of how they work.
Velocity,
First download velocity binary from http://velocity.apache.org/download.cgi.
Now I start eclipse and create a new project called VelocitySample, add 2 velocity jar files to build path.

package xish.velocity.app;
import java.io.StringWriter;
import java.io.Writer;
import java.util.ArrayList;
import java.util.Collection;
import org.apache.velocity.Template;
import org.apache.velocity.VelocityContext;
import org.apache.velocity.app.Velocity;
public class VelocityDemo {
public static void main(String[] args) {
Velocity.init();
Template tp = Velocity.getTemplate("./template/v1.vm");
VelocityContext ctx = new VelocityContext();
Collection users = new ArrayList();
users.add(new User("Jemmy", "jmy32@gmail.com"));
users.add(new User("Funy", "fol@abcenglish.com"));
users.add(new User("lao", "derr@yahoo.com"));
ctx.put("users", users);
Writer writer = new StringWriter();
tp.merge(ctx, writer);
System.out.println(writer);
}
}
VelocityDemo.java
#foreach($user in $users)
$user.Name $user.Email
#end
#include("./template/v2.vm")
v1.vm
The End!
v2.vm
Run VelocityDemo, it will generate following output:
Jemmy jmy32@gmail.com
Funy fol@abcenglish.com
lao derr@yahoo.com
The End!
Xslt,
I create a new project in eclipse called XsltSample.

package xish.xslt.app;
import javax.xml.transform.TransformerConfigurationException;
import javax.xml.transform.TransformerException;
import javax.xml.transform.TransformerFactoryConfigurationError;
public class XsltDemo {
public static void main(String[] args) {
String xmlFile = "./data/users.xml";
String xsltFile = "./template/v1.xslt";
try {
javax.xml.transform.Source xmlSource = new javax.xml.transform.stream.StreamSource(
xmlFile);
javax.xml.transform.Source xsltSource = new javax.xml.transform.stream.StreamSource(
xsltFile);
javax.xml.transform.Result result = new javax.xml.transform.stream.StreamResult(
System.out);
javax.xml.transform.TransformerFactory transFact = javax.xml.transform.TransformerFactory
.newInstance();
javax.xml.transform.Transformer trans = transFact
.newTransformer(xsltSource);
trans.transform(xmlSource, result);
} catch (TransformerConfigurationException e) {
e.printStackTrace();
} catch (TransformerFactoryConfigurationError e) {
e.printStackTrace();
} catch (TransformerException e) {
e.printStackTrace();
}
}
}
XsltDemo.java
<?xml version="1.0" encoding="UTF-8"?>
<users>
<user>
<name>Jemmy</name>
<email>jmy32@gmail.com</email>
</user>
<user>
<name>Funy</name>
<email>fol@abcenglish.com</email>
</user>
<user>
<name>lao</name>
<email>derr@yahoo.com</email>
</user>
</users>
Users.xml
<?xml version="1.0" encoding="UTF-8"?>
<xsl:stylesheet xmlns:xsl="http://www.w3.org/1999/XSL/Transform"
version="1.0">
<xsl:output method="text" indent="yes" />
<xsl:import href="v2.xslt" />
<xsl:template match="/">
<xsl:apply-templates select="users" />
<xsl:call-template name="end"/>
</xsl:template>
<xsl:template match="users">
<xsl:apply-templates select="user" />
</xsl:template>
<xsl:template match="user">
<xsl:value-of select="name" />
<xsl:text> </xsl:text>
<xsl:value-of select="email" />
<xsl:text>
</xsl:text>
</xsl:template>
</xsl:stylesheet>
v1.xslt
<?xml version="1.0" encoding="UTF-8"?>
<xsl:stylesheet xmlns:xsl="http://www.w3.org/1999/XSL/Transform"
version="1.0">
<xsl:output method="text" indent="yes" />
<xsl:template name="end">
<xsl:text>The End!</xsl:text>
</xsl:template>
</xsl:stylesheet>
v2.xslt
Run XsltDemo, it will generate following output:
Jemmy jmy32@gmail.com
Funy fol@abcenglish.com
lao derr@yahoo.com
The End!
StringTemplate,
Download Antlr from http://www.antlr.org/download.html.
Download StringTemplate from http://www.stringtemplate.org/download.html. Notice there are a few class name changes in comparison between v3 to v4. I downloaded the latest version v4.03 upon writing this post.
I created a new project in eclipse called StringTemplateSample, and add antlr-3.3-complete.jar and ST-4.0.3.jar to the build path.

package xish.stringtemplate.app;
import org.stringtemplate.v4.ST;
import org.stringtemplate.v4.STGroup;
import org.stringtemplate.v4.STGroupDir;
public class StringTemplateDemo {
public static void main(String[] args) {
STGroup group = new STGroupDir("./template");
ST st = group.getInstanceOf("v1");
st.addAggr("users.{ name, email }", "Jemmy", "jmy32@gmail.com");
st.addAggr("users.{ name, email }", "Funy", "fol@abcenglish.com");
st.addAggr("users.{ name, email }", "lao", "derr@yahoo.com");
System.out.println(st.render());
//v1(users) ::= "<users:{it|<it.name> <it.email>; wrap}><\n><v2()>;"
//System.out.println(st.render(20));
}
}
StringTemplateDemo.java
v1(users) ::= "<users:{it|<it.name> <it.email><\n>}><v2()>;"
v1.st
v2() ::= "The End!"
v2.st
Run StringTemplateDemo, it will generate following output:
Jemmy jmy32@gmail.com
Funy fol@abcenglish.com
lao derr@yahoo.com
The End!
Subscribe to:
Comments (Atom)